Artwork Guide
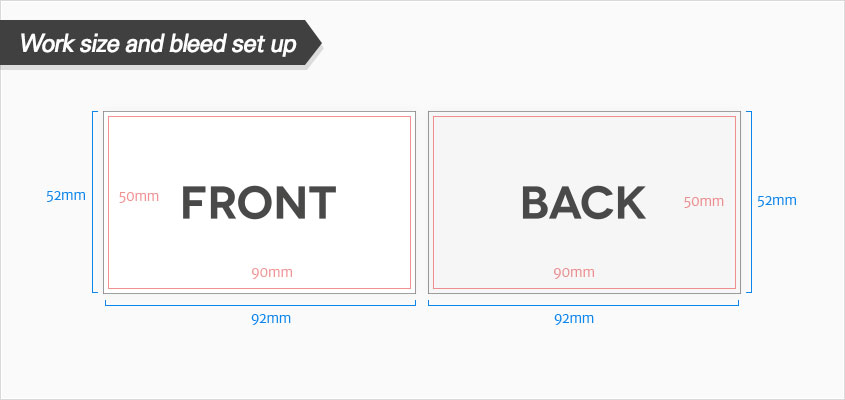
Artwork Dimensions
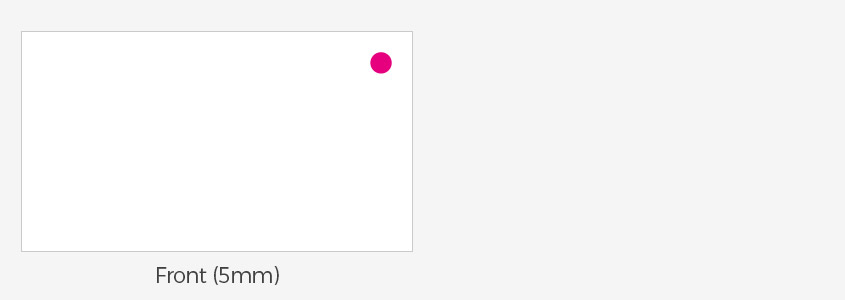
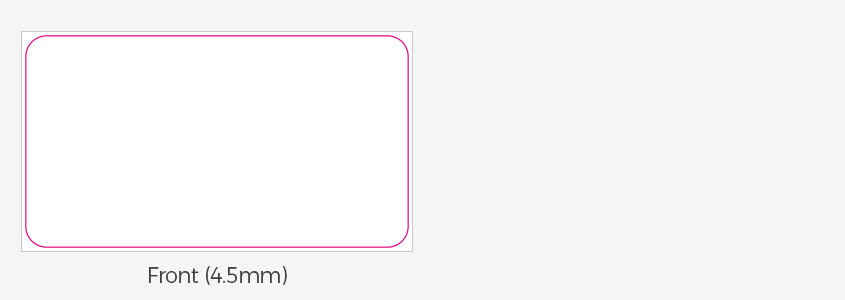
The working size is the size including the bleed which is different for each product. The work size is the same as the virtual artboard size. By downloading a printable template from the "Ordering Page > Template" for each product, you can check the exact size of each product.
Bleed Setup
Because of the nature of the printing process, if there is a background image, it is not easy to print perfectly to the end of the paper. The background image is therefore printed larger than the actual cut area, and cut to the right size. The printing process Bleed goes beyond the edge of the sheet to be cuts. Depending on the production facilities, Bleed sizes differ according to country, print shop and product. For the rest of the world, it normally is 2 ~ 5 mm. Please check the bleed size by product for each product page.
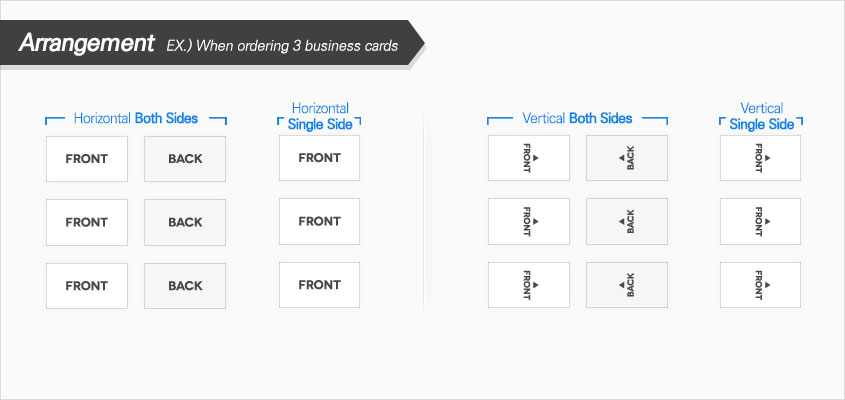
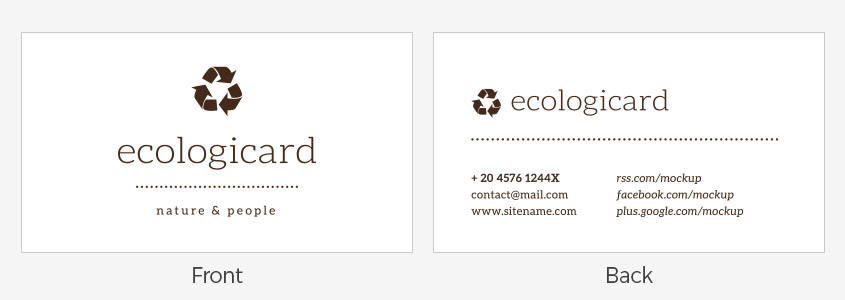
Order Set(s)/Array
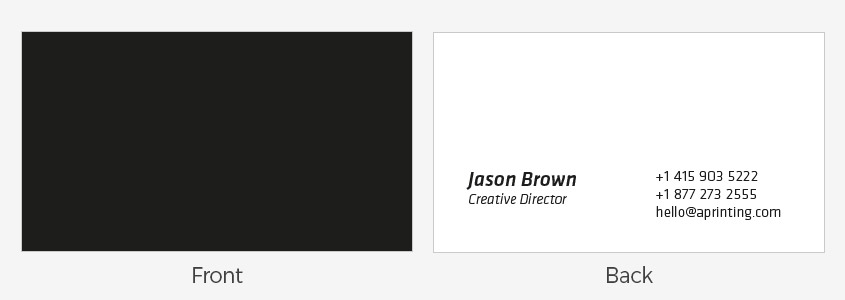
The order sets indicate the amount of different designs for the same specification (size, material, quantity, etc.).
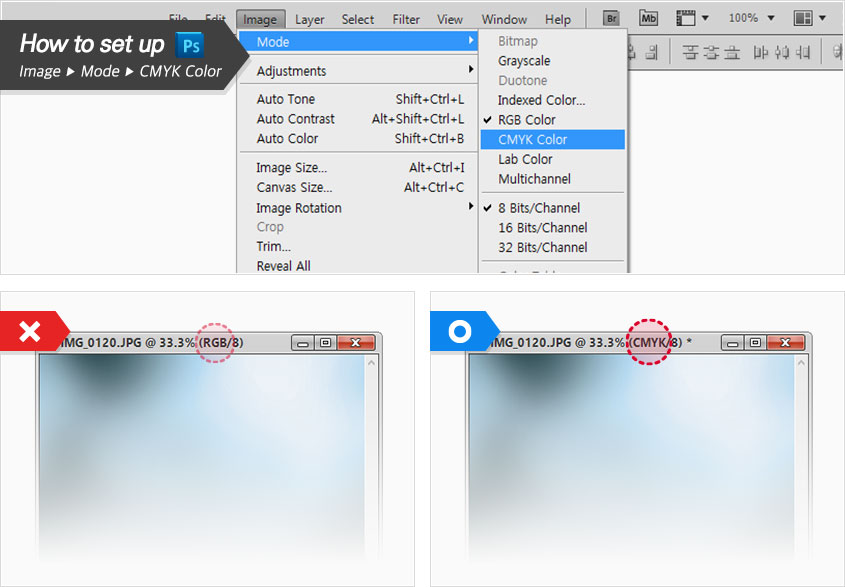
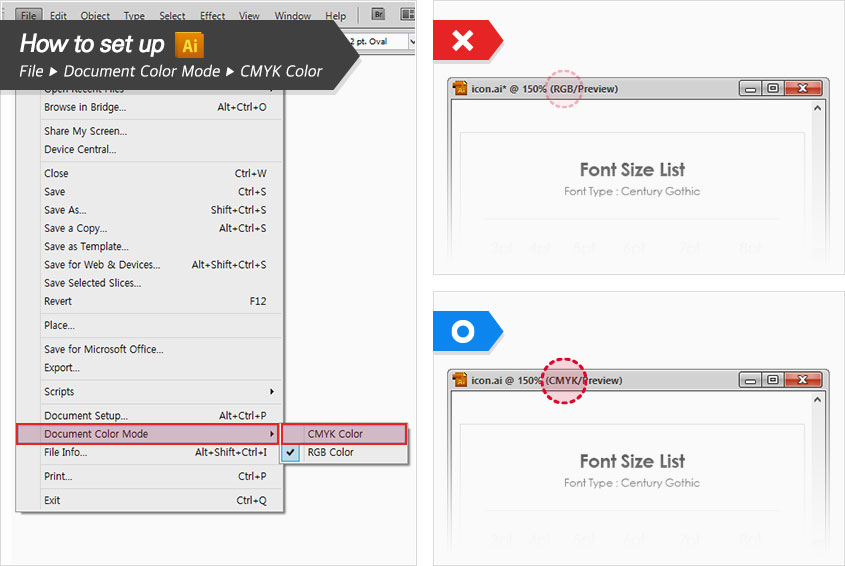
CMYK Color Mode
All of the files to be printed should use the CMYK color space. It is very important. The colors can't print as expected if the file is designed in the RGB colorspace.
The color setting method is as follows.
Adobe Photoshop
Adobe Illustrator
- To set the color mode for a new document
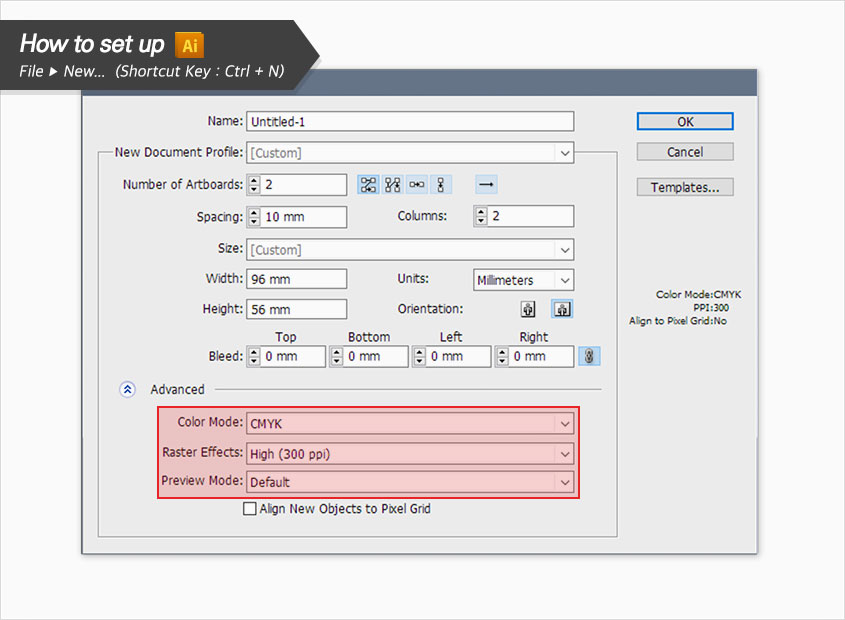
- How to change the color mode of a working file
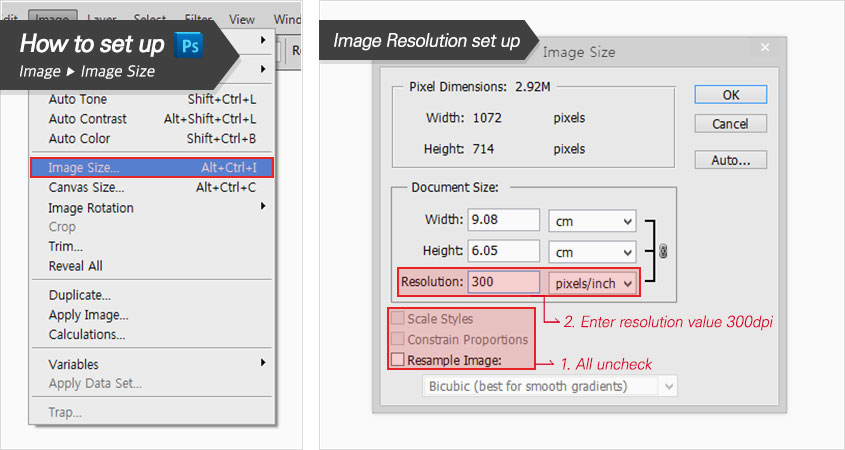
Resolution
Have you ever looked like a mosaic or blurred image when you print an image that looks sharp on a smartphone?
This is a natural phenomenon due to insufficient image resolution. Printable image resolution is typically optimized at about 300 pixels per inch. If you are creating a 4x6 inch postcard, you should first check whether the data is 1200x1800 pixels. The lowest image resolution for standard print quality is 240 pixels per inch.
Adobe Photoshop
Design Size
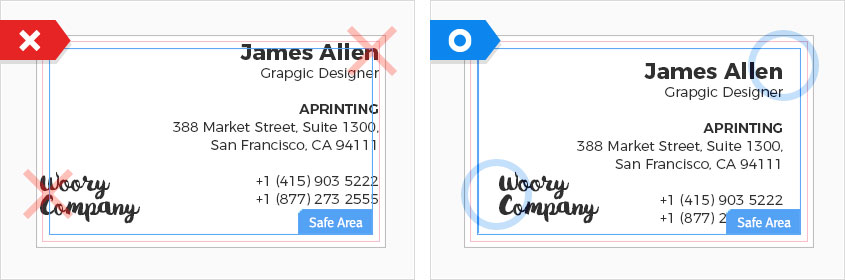
Wrong(Left) : The image size should be the same as the bleed size. In this case, orders can not be accepted.
Correct(Right) : Bleed, cut lines, and safe areas are all perfectly placed.
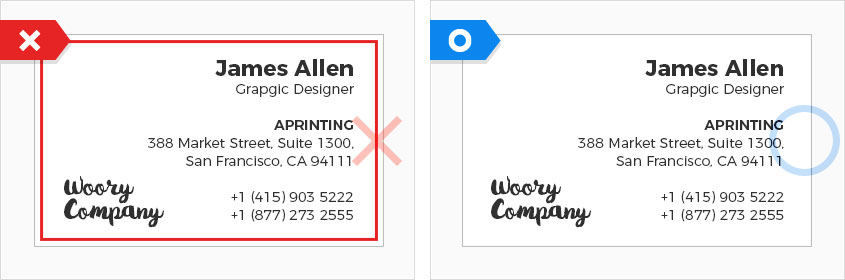
Safe Area
Wrong(Left) : Some objects are out of safe area. Some contents may be cut off at the time of cutting.
Correct(Right) : All objects are placed in the safe area.
Text Readability
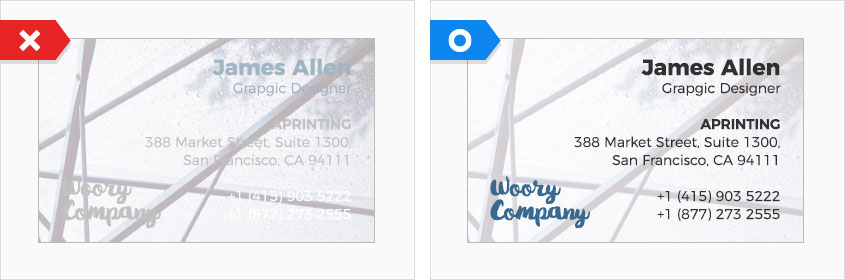
Wrong(Left) : The text color overlaps the background color and is less readable.
Correct(Right) : The text is arranged in the right size and color.
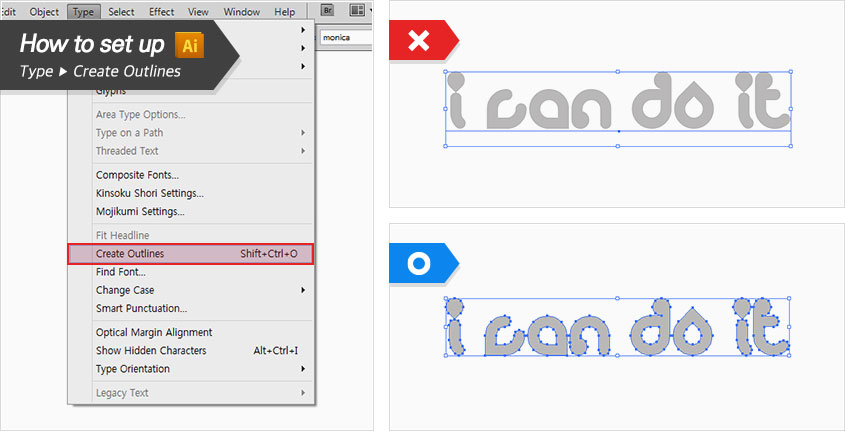
Fonts and Paths
The font outline processing method is as follows
Adobe Illustrator
- How to fix : Choose Type > Create Outlines.
- Shortcut key : Ctrl + Shift + O (Mac : Command + Shift + O)
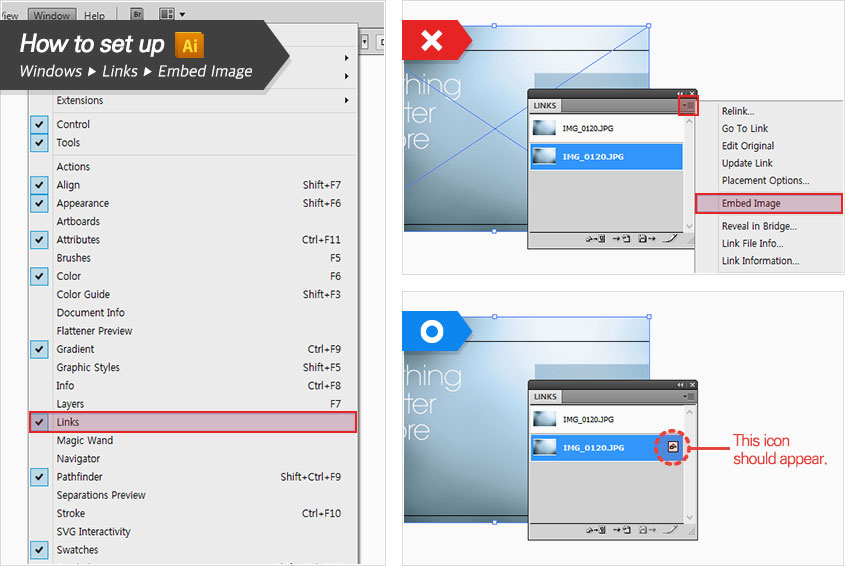
Embed Images
Linked images should be included in the document in the following way.
Adobe Illustrator
- Open panel : On the top menu bar, click Windows> Links to enable the Links panel.
- How to fix : Select the image to embed > Click [≡] in the upper right corner of the panel > Click Embed Image in the menu.
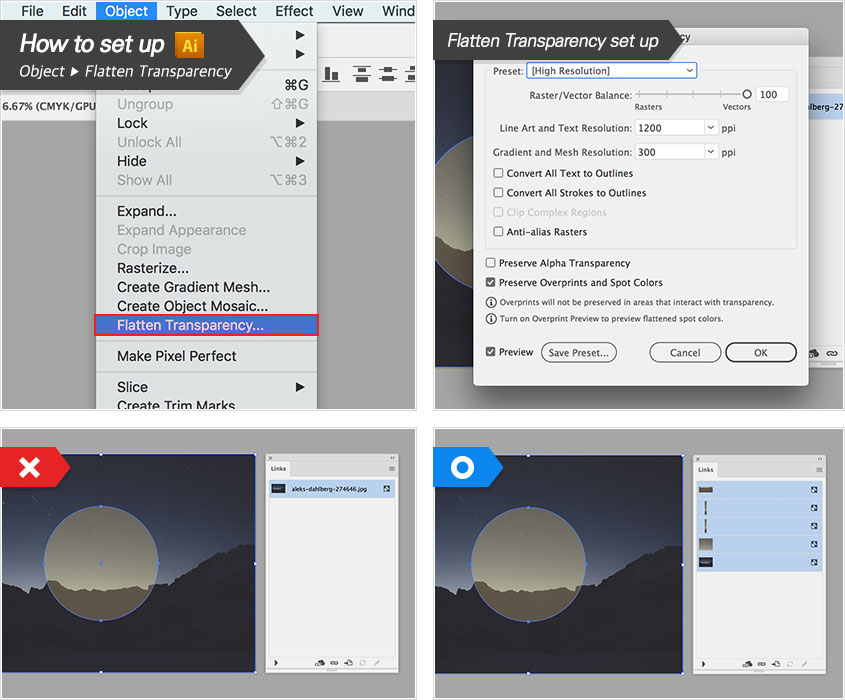
Opacity
If you give the document a transparency effect, you should flatten the object. Flattening separates artwork with transparent effects from vector-based regions and raster-based regions. Flattening is a necessary process for printing complex artwork, including mixed images, vector objects, fonts, spot colors, and overprinting. If flattening is not performed, the following results may occur.
- A white halo appears around the drop shadowed font.
- Printable PDF capacity increases.
- The photographic image is printed in brighter than the original color.
- Gradation effects are not rendered properly.
Adobe Illustrator
- Illustrations, and InDesign, and select "Acrobat 4.0 (PDF 1.3)" to save the PDF as flattening. Or from the illustration menu as shown below. Object > Flatten Transparency (Transparency merging) function.
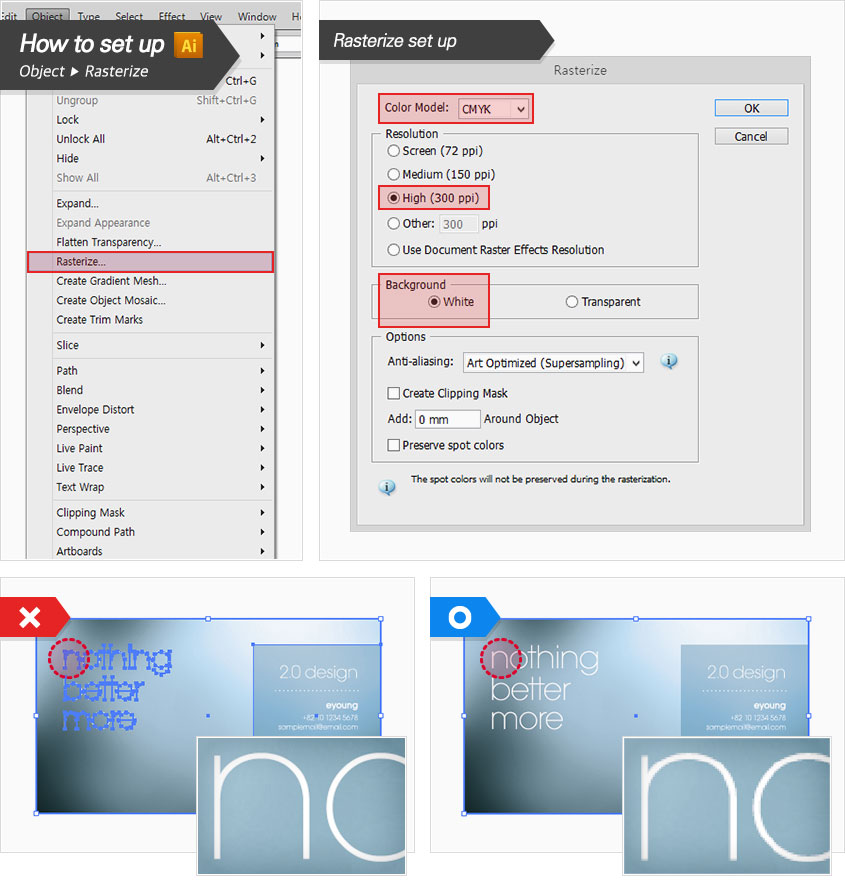
Gradient / Mesh / Blend Objects
Gradient, mesh, and blend effects appear on the monitor, so if you want smooth printing without banding, you need to take into account variables such as final printing equipment, gradient step coverage, illustration, or using Photoshop. Please use the "Rasterize" function as below for the effects basically and contact the customer center for more information.
Adobe Illustrator
TIP. Use light colors or shorten dark blends. The banding occurs frequently in very dark colors and white colors.
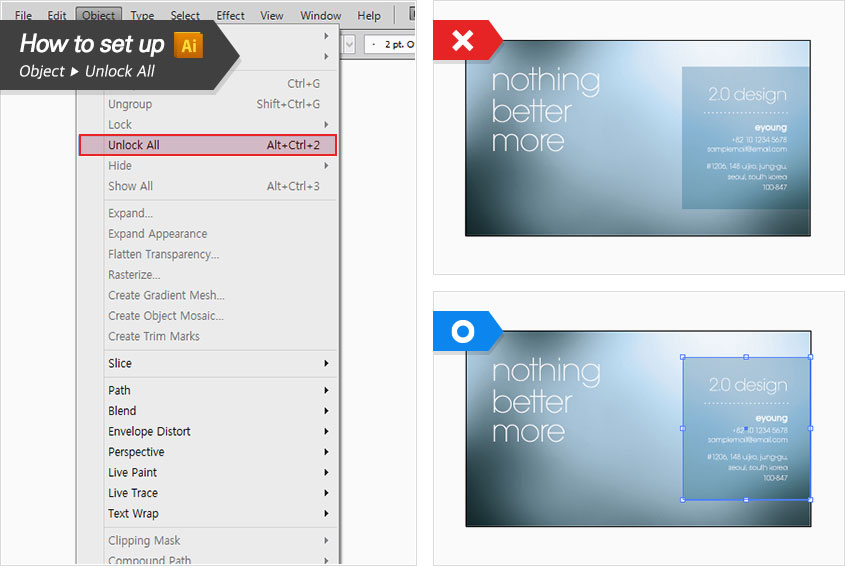
Locked objects
Locked objects must be unlocked as shown below.
Adobe Illustrator
- Quick fix : (Adobe Illustrations only) Object > Unlock All
- Shortcut key : Ctrl + Alt + 2 (Mac : Command + Option + 2)
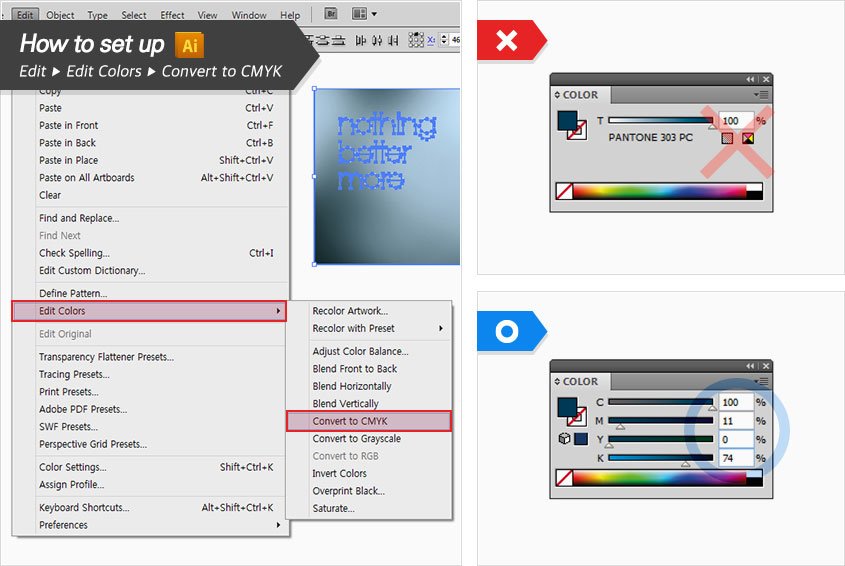
Spot Colors
Most designers like to work with spot colors. However, in reality, spot color printing is not proceeding at most printing shops due to productivity problems. Data including RGB color, Fluorescent color, Pantone, DIC and other spot colors can not be accepted. Please convert spot color to CMYK process color as below.
Adobe Illustrator
Overprinting
Overprint Fill "and" Overprint Stroke "should not be checked as below to prevent printing accident caused by overprinting.
Adobe Illustrator

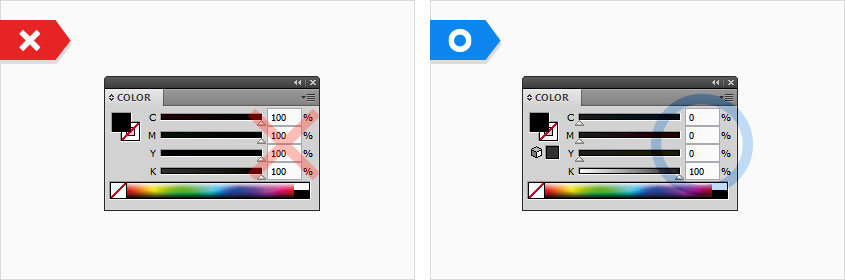
Rich Black
Each company has a color recipe to make a luxurious black color. However, if too much ink is blended, it may cause ink rupture after drying and ink smearing behind the business card.
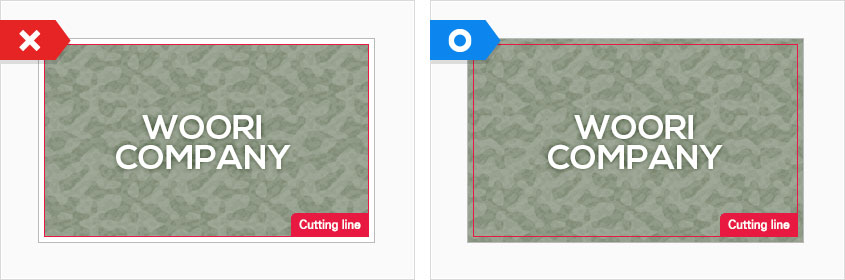
Unnecessary Lines
Wrong(Left) : When you mark a border in the cutting area, it is actually printed.
Do not put a border on the cutting area.
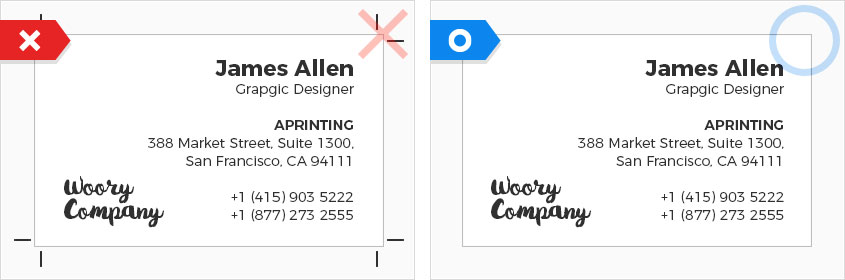
Unnecessary Final Cut Lines
Wrong(Left) : If you put unnecessary cutting line, you will not be able to place an order.
Correct(Right) : Please do not place the cutting line.
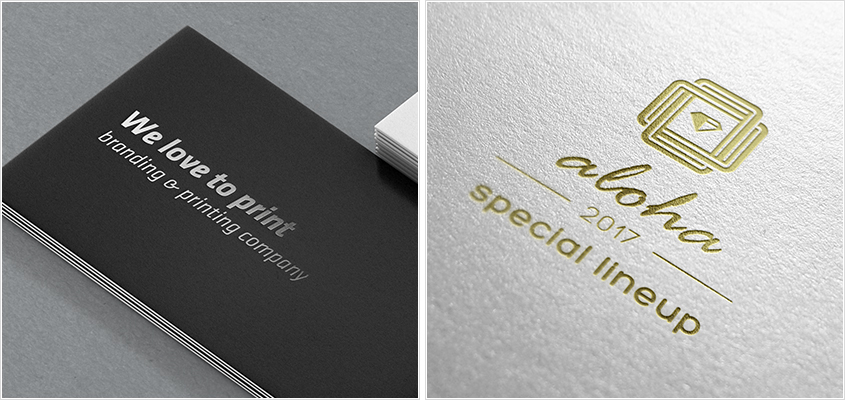
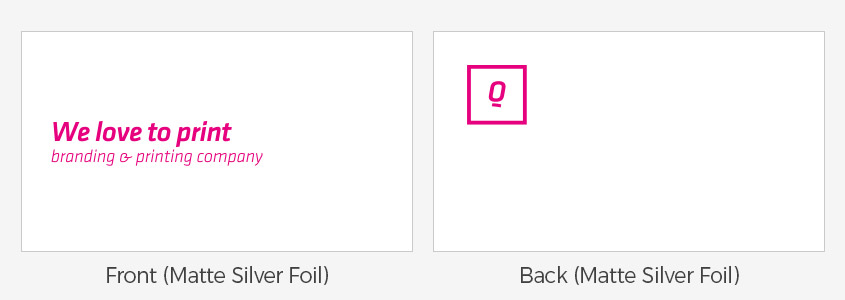
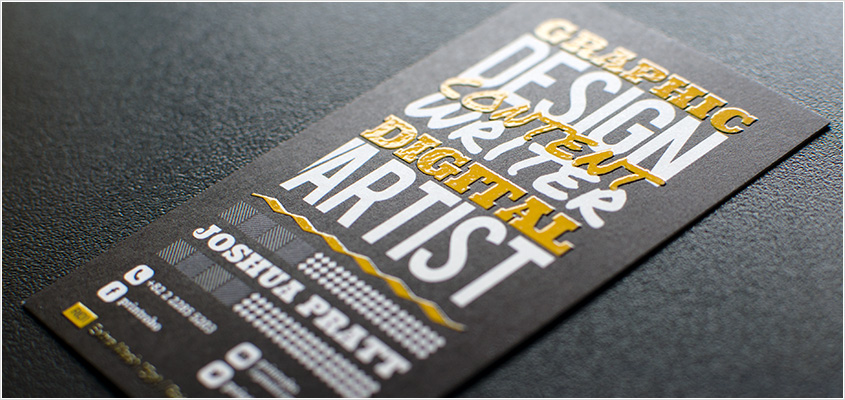
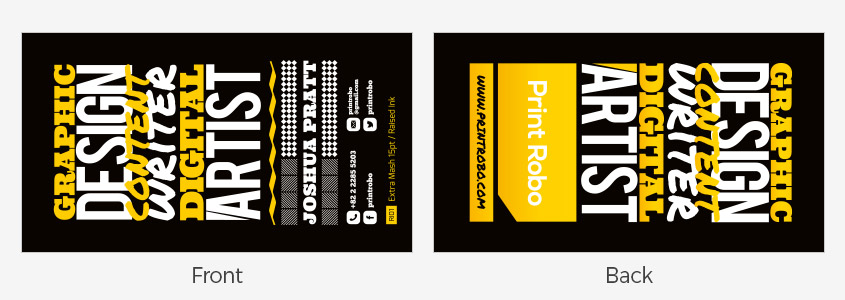
Foil Stamping
Hot foil is a method of pressing metallic film onto paper. The hot foil is always full of luxury over time. There are gold foil (glossy, matte), silver foil (glossy, matte), black, red, blue, green and holographic.
How to
- [Adobe Illustrator only] When you add the foil processing, please put the design artwork that will be applied to the foil under the existing print design artwork. As shown in the picture below, you can work with M100% color parts where hot foil is applied.
CMYK Printing Area
Hot Foil Area
Embossing
The embossing is a three-dimensional processing method that can project or concave certain areas of a point. Hand-felt extrusions are not easily forgotten and help improve brand awareness.
How to
- [Adobe Illustrations only] When you add the embossing/debossing process, please place the design artwork that will be applied to the embossing under the existing print design artwork. As shown in the picture below, you can work with M100% color parts where the embossing/debossing is applied.
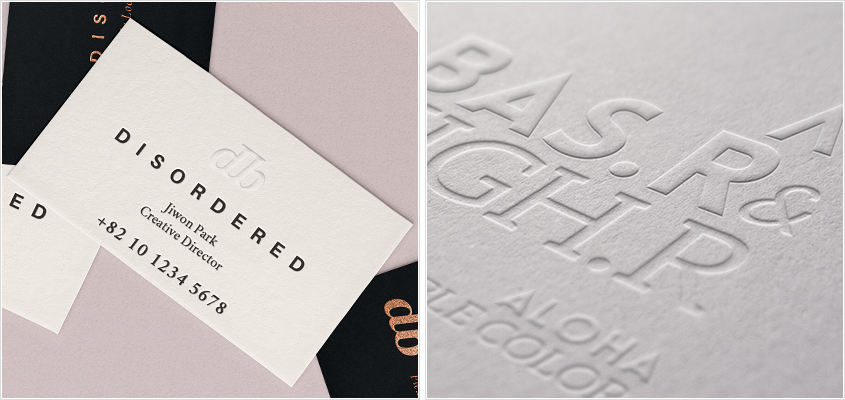
CMYK Printing Area
Embossing/Debossing Area
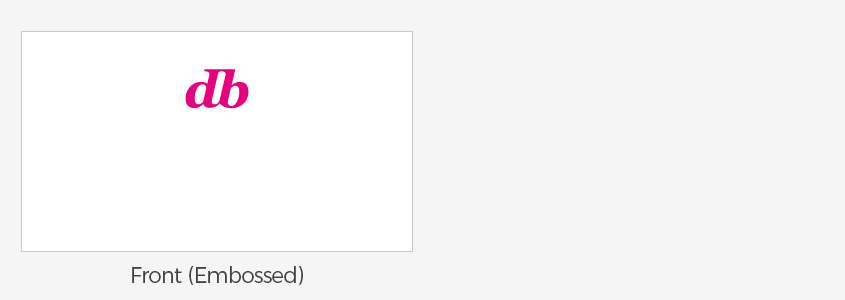
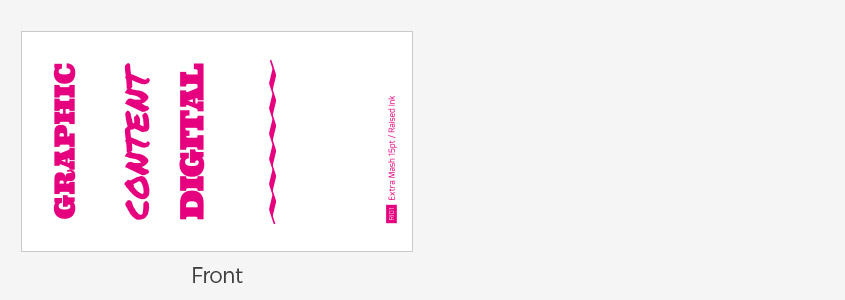
Raised Ink
Raised Ink is a processing method that spreads effervescent embossing powder on a desired mark or mark immediately after printing, and then melts it with heat and gives it lightly to give a three-dimensional feeling. You can leave a deep impression with your hand-felt area.
How to
- [Adobe Illustrator Only] Please place a design artwork to be applied with Raised Ink under the existing print design artwork. As shown in the picture below, you can work with M100% color.
CMYK Printing Area
Raised Ink Area
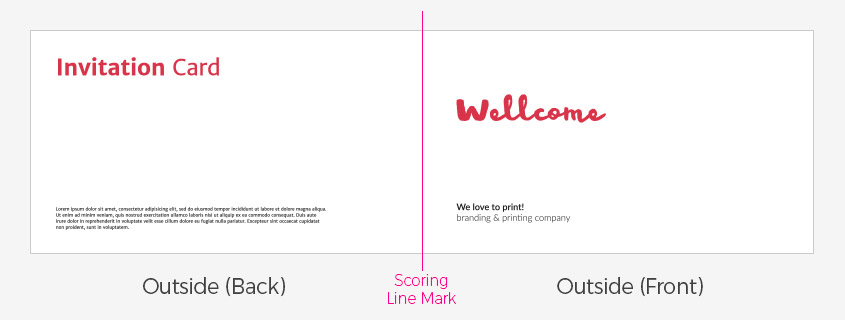
Scoring
Scoring refers to a method of applying pressure to fold the prints for easy folding, or a method of applying pressure to prevent paper from breaking when folded on thick paper.
How to
- [Adobe Illustrator Only] When you add scoring, you can mark the location where scoring will be applied on the existing print design artwork.
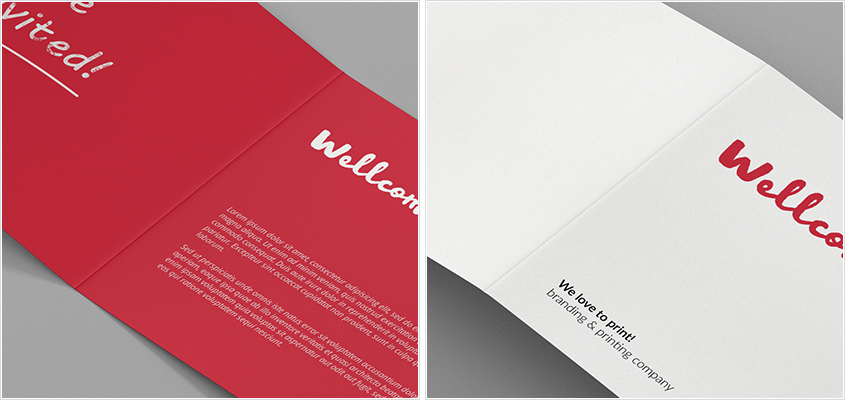
CMYK Printing Area / Scoring location
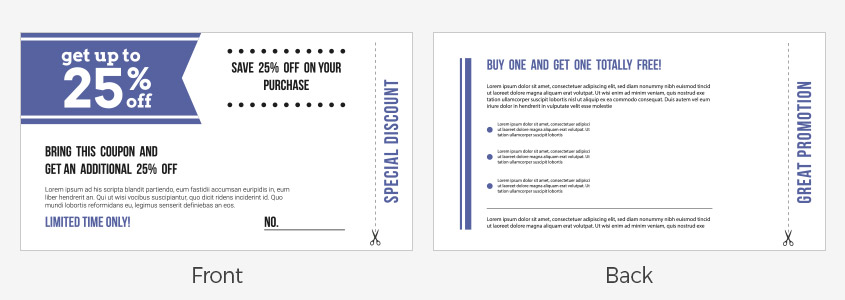
Perforating
Perforating is a cutting method that cuts into a dotted line with a real seam line so that you can easily and neatly take out the paper. It is mainly used for tickets and coupons.
How to
- [Adobe Illustrator Only] When you add perforating, you can mark the location where perforating will be applied on the existing print design artwork.
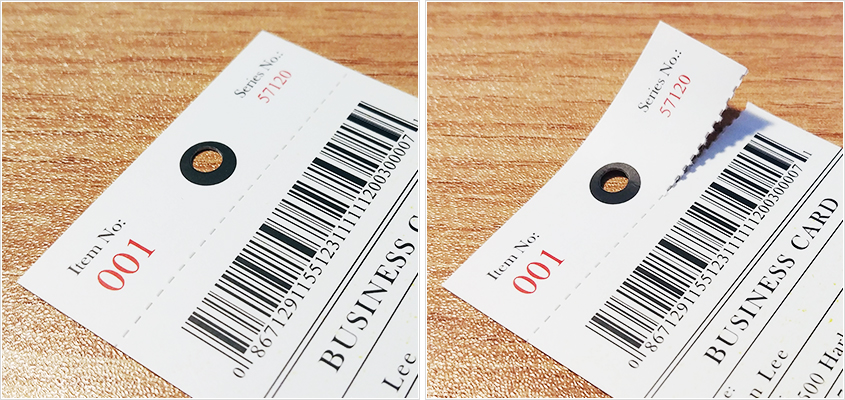
CMYK Printing Area / Perforating Location

Hole Drilling
It refers to punching holes in paper.
How to
- [Adobe Illustrator Only] In addition to the existing print design artwork, please arrange the design artwork to be applied to the hole drilling. As shown in the picture below, you can work with M100% color.
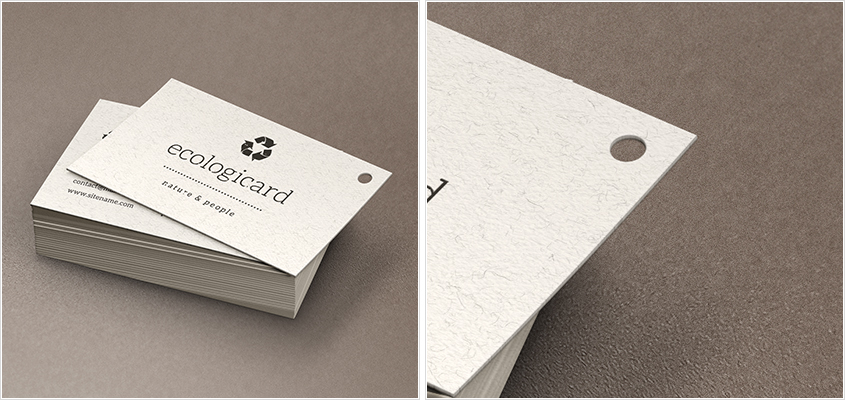
CMYK Printing Area
Hole Drilling Area
Rounded Corners
Round corners are the process of rounding the corners of a product to make a business card or a particular print. It is a process that is used mainly when you want to give off a soft and firm image.
How to
- [Adobe Illustrator Only] In addition to the existing print design artwork, please arrange the design artwork to be applied to the rounded corners. As shown in the picture below, you can work with M100% color.
CMYK Printing Area

Rounded Corners Area
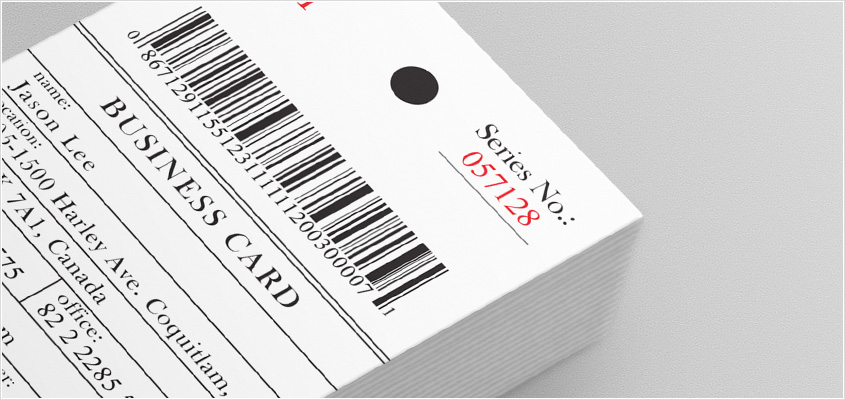
Numbering
It is a separate print job that serializes the prints that require serial numbers, such as tickets, lotteries, winners, securities or office slips.
How to
-
[Adobe Illustrator Only] Please leave space for numbering, and mark under the existing print design artwork separately.
Numbering The printing area size is 26 mm x 8 mm (width x height) based on 6 digits.
CMYK Printing Area
Numbering Area

Die Cutting
How to
- [Adobe Illustrator Only] When adding Die Cut, please put the design artwork that will be applied to die cut under the existing print design artwork. As shown in the picture below, you can work with M100% color.
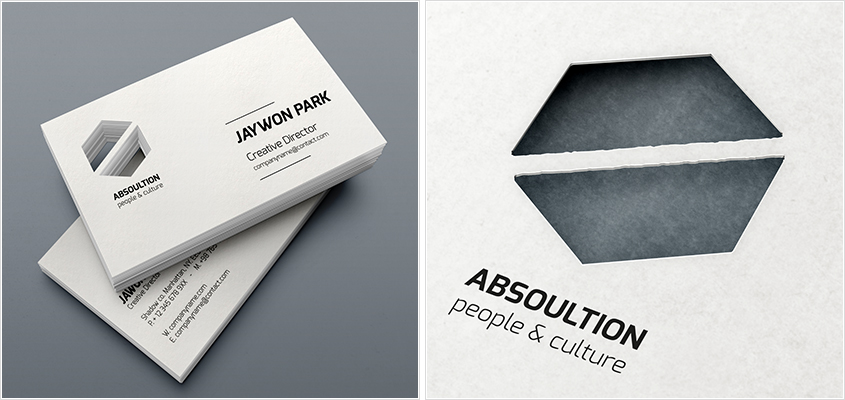
CMYK Printing Area
Die Cut Area